
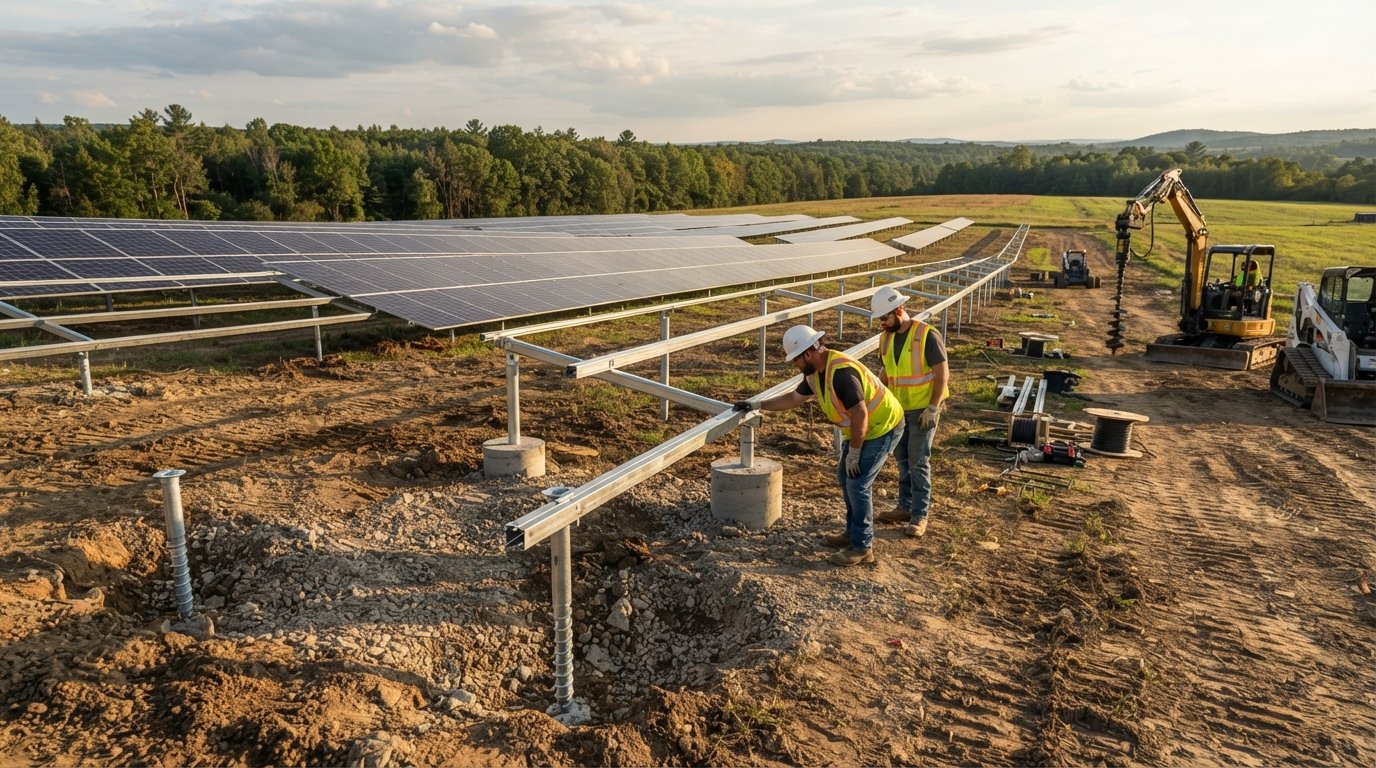
Ground Mount Solar Foundations: Soil and Design Options
Match your ground mount foundation to soil, slope, and frost depth for decades of reliable output. Call (833)-212-3715 for expert guidance.

By Julia Walsh
Learn more about Solar Panel Installation and Repair for guides, costs, and what to expect.
Compare Solar Panel Installation and Repair Pros Near You

Enter your ZIP code to compare top-rated local professionals and request free quotes.
A ground mount solar array can outperform a roof mount in nearly every measurable way: easier maintenance, better tilt angles, and no roof penetrations to worry about. But all of that performance rests on a single, often overlooked decision: what goes underground. The foundation you choose, and whether your soil can support it, determines whether your array stands firm for 25 years or shifts, settles, and cracks within a few seasons. Rural homeowners planning a ground mount need to match the structure to the site before a single panel is ordered, because foundation mistakes are expensive to fix and nearly impossible to hide.
This guide walks through the main foundation types, how soil and climate conditions dictate the right choice, what permitting typically involves, and how costs and longevity compare across systems. The goal is simple: help you ask the right questions before an installer arrives, so your ground mount is engineered for your dirt, not just for a catalog drawing.
Why the Foundation Decides the Fate of a Ground Mount
A solar panel ground mount foundation options and soil requirements analysis starts with physics. A ground-mounted array acts like a sail: wind loads push against the panel surface, and the foundation must resist uplift, lateral shift, and overturning moment. Unlike a roof mount, which borrows the structural mass of a building, a ground mount stands alone, so every force transfers directly into the soil through the foundation. That is why two identical arrays in two different states can require completely different foundation designs.
Soil conditions drive three key engineering questions. First, what is the bearing capacity, meaning how much load the soil can support without excessive settlement? Second, how does the soil behave when wet, since clay expands, sand shifts, and loam compacts unpredictably? Third, where is the frost line, because freezing and thawing soil can heave a shallow foundation upward year after year. Ignoring any of these factors is the most common reason ground mounts fail inspections or develop wobble over time.
In practice, a professional site assessment usually combines a visual survey, a soil map review, and sometimes a test pit or boring to confirm what lies beneath the topsoil. If you are still early in the planning process, it helps to understand how to compare solar financing options and maximize savings alongside foundation costs, since the two budget lines often compete for the same dollars.
The Four Main Foundation Types Compared
Most residential ground mounts rely on one of four foundation systems. Each has a distinct installation method, soil suitability profile, and cost range, and the right pick depends on your site conditions and local code.
Driven Piles
Driven piles are steel posts hammered directly into the ground, typically three to seven feet deep depending on load and soil. They are fast, relatively inexpensive, and require no curing time, which makes them a favorite for sandy and loamy soils with good drainage. The catch is that driven piles struggle in rocky ground, where refusal can stop a post short, and in expansive clay, where seasonal movement can loosen the pile over time. Installers often verify capacity with a pull test on the first pile before committing to the full array.
Helical Piers
Helical piers are steel shafts with spiral blades that are screwed into the soil like a giant screw. They work well in a wider range of soils, including soft clay and filled ground, because the blades engage deeper, more stable strata. Installation is quick and torque readings give real-time confirmation of load capacity, which is valuable for permitting. Helical piers cost more per unit than driven piles but often reduce total foundation cost on marginal sites by avoiding excavation and concrete. They are less effective in dense gravel or solid rock, where the blades cannot advance.
Concrete Ballast
Ballast foundations use heavy concrete blocks or pre-cast weights sitting on a prepared gravel pad, holding the array down through sheer mass rather than ground penetration. This is the go-to option where digging is impossible or prohibited, such as capped landfills, brownfields, or sites above utilities. Ballast systems are simple to install and easy to remove, but they require a very level pad and enough weight to resist uplift, which can mean a large footprint. On soft soils, the pad itself may need geotechnical reinforcement to prevent sinking.
Poured Concrete Footings
Poured footings, typically sonotubes filled with concrete and rebar, are the traditional, belt-and-suspenders option. They offer excellent uplift resistance and work in nearly any soil, including expansive clay, provided they are deep enough to reach stable strata or below frost depth. The tradeoffs are time and cost: excavation, forms, rebar, and concrete curing add days to the schedule and typically make poured footings the most expensive option per post. For large arrays or high-wind zones, though, they are often the most reliable long-term choice.
To summarize the tradeoffs, here is how the four systems stack up on the factors that matter most:
- Driven piles: lowest cost, fastest install, best in sand and loam, poor in rock and expansive clay.
- Helical piers: mid-range cost, fast install, versatile across soft and filled soils, limited in dense rock.
- Concrete ballast: mid-range cost, no digging, ideal for capped or utility-burdened sites, needs level ground and large footprint.
- Poured footings: highest cost, slowest install, excellent in almost any soil, the standard for high-wind and frost-heavy regions.
Many installers mix systems on a single site, for example using driven piles on the well-drained upper slope and helical piers in the low, wet corner. A good designer will not force one foundation type across variable ground.
How Soil Type, Slope, and Frost Depth Dictate the Choice
Soil type is the first filter. Sandy and gravelly soils drain well and offer predictable friction for driven piles, but they can lack cohesion, so deeper embedment is often required. Clay soils, especially expansive clays common in Texas and the Southeast, swell when wet and shrink when dry, exerting cyclical pressure that can crack concrete and jack piles upward. Silt and loam sit in between but can lose strength when saturated. Organic soils, fill dirt, and former farm fields warrant extra caution, since buried debris and soft spots can undermine any foundation.
Slope adds a second layer of complexity. A modest grade is manageable with stepped post lengths, but steep slopes increase both wind exposure and the lateral loads on uphill posts. On grades above roughly 15 percent, engineers often specify deeper footings or a ballasted racking design that spreads load across a wider pad. Drainage matters too: water pooling around posts accelerates corrosion and softens soil, so grading and French drains are sometimes part of the foundation plan.
Frost depth is the third determinant, and it is non-negotiable in cold climates. In regions where the ground freezes, footings must extend below the local frost line, or frost heave will lift and twist the array. That can push a simple driven pile design into a poured footing or helical pier design, since both can reach the required depth with less disruption. Your local building department publishes the frost depth used for code compliance, and an engineer will design to it.
Permitting and Inspection for Ground-Mounted Arrays
Ground mounts almost always require a building permit, and the foundation is a central part of the submittal. Most jurisdictions want to see a site plan, structural calculations or an engineered stamp, and foundation details that reference soil capacity and frost depth. Some areas add zoning review for setbacks, height limits, and screening, particularly in rural districts with scenic or agricultural protections. Historic districts and homeowner associations may impose additional design conditions.
Inspection typically happens in stages. A footing inspection occurs after holes are dug and rebar placed but before concrete is poured, so the inspector can verify depth, diameter, and reinforcement. For driven piles and helical piers, inspectors may review installation logs or torque records instead. A final inspection confirms the array is bonded, grounded, and installed per the approved plans. Skipping permits to save time is a false economy: unpermitted arrays can complicate home sales, void insurance claims, and force costly retrofits.
Because rules vary so widely by state and county, it is worth confirming local requirements early. Resources that connect homeowners with vetted local professionals, such as FreeSolarPowerQuotes, can help you find installers familiar with your jurisdiction's inspection process, which often saves weeks of back-and-forth.
Cost and Longevity: What to Expect
Foundation costs vary by region, soil, and array size, but rough ranges help set expectations. Driven piles are typically the least expensive per post, often a few hundred dollars each installed. Helical piers generally run somewhat higher per unit but can reduce site work. Concrete ballast sits in a similar mid-range but may require a larger gravel pad. Poured footings are usually the most expensive per post because of excavation, concrete, and labor, sometimes two to three times the cost of a driven pile.
Longevity favors the more robust systems. A properly engineered poured footing or helical pier in suitable soil can last the full 25-to-30-year life of the array with minimal maintenance. Driven piles perform well in stable soils but may need re-tightening or replacement in expansive clay. Ballast systems last well but depend on pad integrity and periodic weight checks. Galvanized steel and proper drainage extend life across all types; corrosion is the quiet killer of foundations in wet or coastal environments.
It also pays to think about the total system budget rather than the foundation line alone. A slightly more expensive foundation that avoids soil remediation, extra grading, or a failed inspection is usually the cheaper path. Homeowners comparing quotes should ask each installer to specify the foundation type, design assumptions, and warranty, because a low bid that assumes ideal soil can balloon once digging begins.
Practical Steps Before You Break Ground
Before committing to a foundation design, take a few concrete steps. Request a soil assessment or at least a review of the county soil survey for your parcel. Confirm the local frost depth and wind speed requirements with the building department. Ask installers how they handle rock, water, and variable soil across the array footprint. Finally, get the foundation type and depth written into the contract, not left as a verbal assumption.
Ground mounts reward planning. When the foundation matches the soil and the climate, the array becomes a quiet, low-maintenance asset that produces power for decades. When it does not, every season of freeze and thaw, or every wet spring, becomes a reminder of the shortcut. Treat the underground work with the same seriousness as the panels above it, and your ground mount will justify the decision many times over.