Solar Panel Bird Proofing: Methods and Top Products
Learn the best solar panel bird proofing methods and products to protect your investment, boost efficiency, and avoid costly repairs.

By Andy Pearson
Learn more about Solar Panel Installation and Repair for guides, costs, and what to expect.
Compare Solar Panel Installation and Repair Pros Near You

Enter your ZIP code to compare top-rated local professionals and request free quotes.
Solar panels are a significant investment in your home's energy future, but they can also become an unintentional haven for birds. The space between the panels and your roof offers warmth, shelter from predators, and a perfect nesting spot. While the idea of birds nesting under your solar array might seem harmless, the reality is that it can lead to serious problems, including reduced energy output, damaged wiring, and costly repairs. This is why understanding effective solar panel bird proofing methods and products is not just an optional upgrade; it is a critical part of protecting your solar investment.
Bird droppings, nesting materials, and feathers can accumulate under and around your panels, creating a mess and attracting pests. Furthermore, birds can peck at the wiring, which can cause system failures and even create a fire hazard. By taking proactive steps, you can prevent these issues, maintain your system's efficiency, and avoid expensive maintenance calls. In this guide, we will explore the most effective strategies and products available to keep your panels bird-free, ensuring your renewable energy system performs at its best for years to come.
Why Bird Proofing Your Solar Panels Is Essential
Protecting your solar panels from birds is about more than just keeping your roof clean. It is about preserving the efficiency and longevity of your entire solar energy system. When birds nest under your panels, they obstruct airflow, which can cause the panels to overheat and operate less efficiently. In fact, studies have shown that an over-heated panel can lose up to 20% of its power output. Additionally, debris and nesting materials can create hotspots on the panels, potentially leading to micro-cracks and permanent damage.
Beyond performance issues, there is a significant financial risk. Pigeons and other birds are known to cause extensive damage by pecking at the rubber seals and wiring under the panels. Repairing this damage can cost hundreds, if not thousands, of dollars. Moreover, the presence of bird droppings can void your solar panel warranty, as most manufacturers consider it a form of damage caused by pests. By investing in bird proofing, you are not only avoiding these costs but also protecting your system's warranty and ensuring you get the maximum return on your investment.
Proactive Bird Deterrents for Solar Panels
Before birds ever discover the inviting space under your solar array, you can take proactive steps to make the area less attractive. These deterrents are designed to discourage birds from landing, roosting, or nesting from the start. While they may not be 100% effective on their own, they can be a valuable part of an integrated bird management strategy.
One popular proactive approach is the use of ultrasonic bird repellents. These devices emit high-frequency sounds that are uncomfortable for birds but inaudible to humans and pets. However, their effectiveness is debatable, as birds can become accustomed to the noise over time. A more reliable physical deterrent is the use of bird spikes on the ridge of your roof or on ledges where birds commonly perch. These spikes make it physically impossible for birds to land comfortably, encouraging them to move elsewhere.
Let's explore some of the most common proactive methods:
- Visual deterrents: Reflective tape, predator decoys (like owls or hawks), and shiny objects can scare birds away, though their efficacy often diminishes as birds get used to them.
- Motion-activated sprinklers: These can startle birds and other animals with a sudden burst of water, but they are not practical for roof-mounted solar panels.
- Bird gel: This sticky, transparent substance can be applied to ledges and perching spots, creating an unpleasant surface that birds avoid.
While these deterrents can help, they are often not sufficient to fully protect a solar panel installation. The most reliable and long-lasting solution is to physically block birds from getting under your panels in the first place.
Effective Bird Proofing Methods: Physical Barriers and Exclusion
The most effective way to protect your solar panels is through exclusion, which means creating a physical barrier that prevents birds from accessing the area beneath your array. This is considered the gold standard in solar panel bird proofing methods and products because it offers a permanent and reliable solution. By sealing off the perimeter of your solar panels, you deny birds the sheltered space they seek for nesting and roosting.
There are several types of physical barriers available, each with its own set of advantages and installation considerations. Choosing the right one depends on your roof type, the specific layout of your solar panels, and your budget. It is crucial to select a method that does not interfere with the airflow or the structural integrity of your mounting system, as poor installation can void your panel warranty or even cause damage.
When considering physical barriers, you will encounter a few main options. Each has its own set of benefits and potential drawbacks.
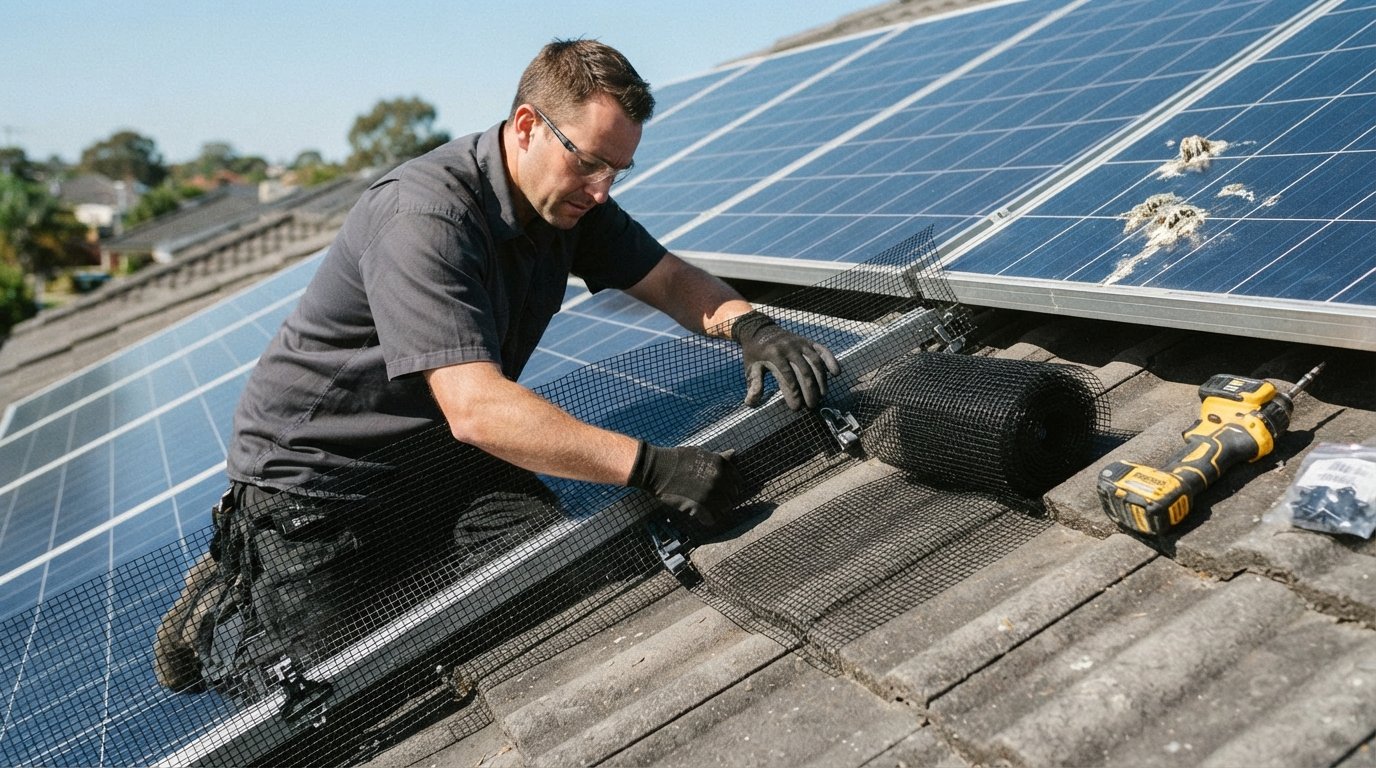
- Bird mesh or netting: This is a highly effective, versatile option. A fine, UV-stabilized mesh is installed around the perimeter of the solar array, creating a durable barrier that keeps birds out while still allowing for airflow. It is a popular choice for both residential and commercial installations.
- Rubber edging or trim: This involves installing a flexible rubber strip that fits snugly between the solar panel and the roof tiles. It seals the gap along the edges of the panels, preventing birds, rodents, and debris from getting underneath. This is often the most aesthetically pleasing option, as it is nearly invisible from the ground.
- Critter guards: These are rigid, pre-formed guards that are attached to the perimeter of the solar panels. They are often made of aluminum or heavy-duty plastic and are designed to block the sides of the array. Critter guards are effective but can be less discreet than edging.
Professional installation is strongly recommended for these physical barriers. A certified solar installer or a specialized bird-proofing company will have the knowledge and equipment to install these products safely and effectively. They will also ensure that no warranties are voided and that the barriers are properly sealed to prevent any gaps. Attempting a DIY installation can be risky, both for your safety and for the integrity of your solar system.
Top Products for Solar Panel Bird Proofing
If you decide to tackle bird proofing yourself, or if you want to be specific when talking to a professional, here are some of the top-rated products on the market. These products have been reviewed for their durability, effectiveness, and ease of installation.
Bird Mesh and Netting Systems
For a robust and comprehensive solution, bird mesh is a clear winner. High-quality mesh is typically made from polyethylene or nylon and is treated with UV protection to withstand years of harsh sunlight. Look for mesh with a small grid size (around 1 inch or less) to prevent even small birds from squeezing through. Installation involves clipping the mesh to the underside of the solar panels and securing it to the roof, creating a complete barrier.
Some popular mesh products include those from Solar Bird Blocker and Bird-Out. These systems come with pre-cut kits or rolls of mesh and a set of clips that attach securely to the panel frame. The key is to ensure the mesh is pulled taught and properly secured to prevent sagging or animals from tearing it. While it can be a more involved DIY project, the results are exceptional and long-lasting.
Rubber Edging and Trim Kits
Rubber edging is an excellent choice aesthetically, as it is virtually invisible from the ground. Products like the Solar Trim from Bird Proof are designed to be flexible yet sturdy, creating a complete seal around the perimeter of your panels. They are made from a durable, UV-resistant rubber that can withstand extreme temperatures, from freezing winters to blistering summer heat.
The installation of rubber edging is straightforward. You slide the flexible edge under the frame of the solar panel and secure it to the roof tiles using screws and washers. It is crucial to ensure a tight fit to leave no gaps. This method is particularly effective for homes with tile roofs, as the rubber conforms to the shape of the tiles. However, it may be less effective on roofs with uneven surfaces or large gaps.
Critter Guards and Perimeter Fences
Critter guards are a more rigid form of protection. Often made from aluminum, steel, or heavy-duty PVC, they are installed around the perimeter of the solar array to block the sides. These guards are less discreet than rubber edging but offer a very strong physical barrier. They are particularly useful for installations where there is a larger gap between the panel and the roof, such as on flat roofs or when panels are installed with a steep tilt.
Products like the Solar Shield critter guard are available in various heights to accommodate different installation angles. They are typically attached to the panel frame with brackets and screws. One of the advantages of critter guards is their durability; they can withstand significant pressure from animals and weather. However, they can be more visible and may detract slightly from the aesthetic of your solar installation.
How to Choose and Install Solar Panel Bird Proofing
Choosing the right bird-proofing solution involves evaluating several factors, including your roof type, the pitch of your solar panels, and your aesthetic preferences. For a tile roof, rubber edging is often the best choice because it conforms to the curves of the tiles. For a composition shingle roof, bird mesh or a critter guard might be easier to install and secure. If you live in an area with a high bird population or with strong winds, you may want to opt for the strongest possible barrier, such as a heavy-duty mesh or metal critter guard.
Once you have selected your product, you have two main options: do it yourself or hire a professional. If you are handy and comfortable working on a roof, many bird-proofing kits are designed for DIY installation. However, it is imperative to follow all safety guidelines, use proper safety equipment, and be cautious when working near electrical components and at heights. If you have a complex roof layout or are not comfortable with the task, hiring a professional is always the safer and often more cost-effective choice in the long run.
Here are the general steps for installing a typical bird mesh or rubber edging system:
- Safety first: Set up a stable ladder and use a safety harness if possible. Ensure you have a spotter on the ground.
- Clean the area: Before installing any barrier, thoroughly clean under and around your solar panels to remove any existing nests, droppings, or debris. This step is crucial to prevent future pest issues.
- Install the barrier: For mesh, unroll it along the perimeter of the panels and attach it using the provided clips, ensuring it is taut. For rubber edging, slide the edge under the panel frame and secure it to the roof with screws and washers.
- Seal all gaps: The most critical step is to ensure there are no gaps or holes in your barrier. Inspect the entire perimeter and re-secure any loose sections. Birds can fit through surprisingly small openings.
After installation, it is wise to inspect your bird-proofing system at least once a year. Look for signs of wear and tear, such as loose clips, torn mesh, or lifted edging. Regular maintenance will ensure your system continues to protect your solar investment effectively.
Professional Bird Proofing Services
While some homeowners are comfortable with a DIY approach, many prefer the peace of mind that comes with professional installation. A professional solar panel service company, like those you can find through a reputable quote platform, will have the experience and equipment to handle the job safely and correctly. They can also offer a warranty on their workmanship, giving you added confidence.
Professional bird proofing typically costs between $300 and $600 per system, depending on the size of your array and the complexity of the installation. This cost is a small price to pay compared to the potential repair bills from bird damage, which can run into the thousands. When you hire a professional, they will also perform a full inspection of your system, identifying any existing damage and ensuring that your panels are in good condition before installing the barriers. For those looking to maximize their solar investment, this service is an essential part of ongoing maintenance.
As you consider your options, remember that the goal is to find a solution that offers long-term protection. A well-installed bird-proofing system will last for many years, providing you with continuous peace of mind.
Conclusion
Investing in solar panel bird proofing methods and products is an essential step in protecting your solar energy system. It ensures that you maintain the high efficiency of your panels, avoid costly repairs, and extend the life of your equipment. Whether you choose a DIY approach with mesh and edging or enlist the help of professionals, the key is to act before birds become a problem. For more information on solar energy and to compare quotes from certified installers, you can explore resources like SolarEnergy.ai and our guide on solar financing to ensure your entire system is set up for success. By taking these proactive steps, you will enjoy the full benefits of clean, renewable energy without the unwanted presence of feathered pests.